SwiftUI navigation without file-based routing: NavigationStack, a Route enum and deep links
How to move mentally from Expo Router to SwiftUI: NavigationStack with a Route enum, the Coordinator pattern, deep links and Universal Links, and what swift-navigation adds when sheets and alerts become state.
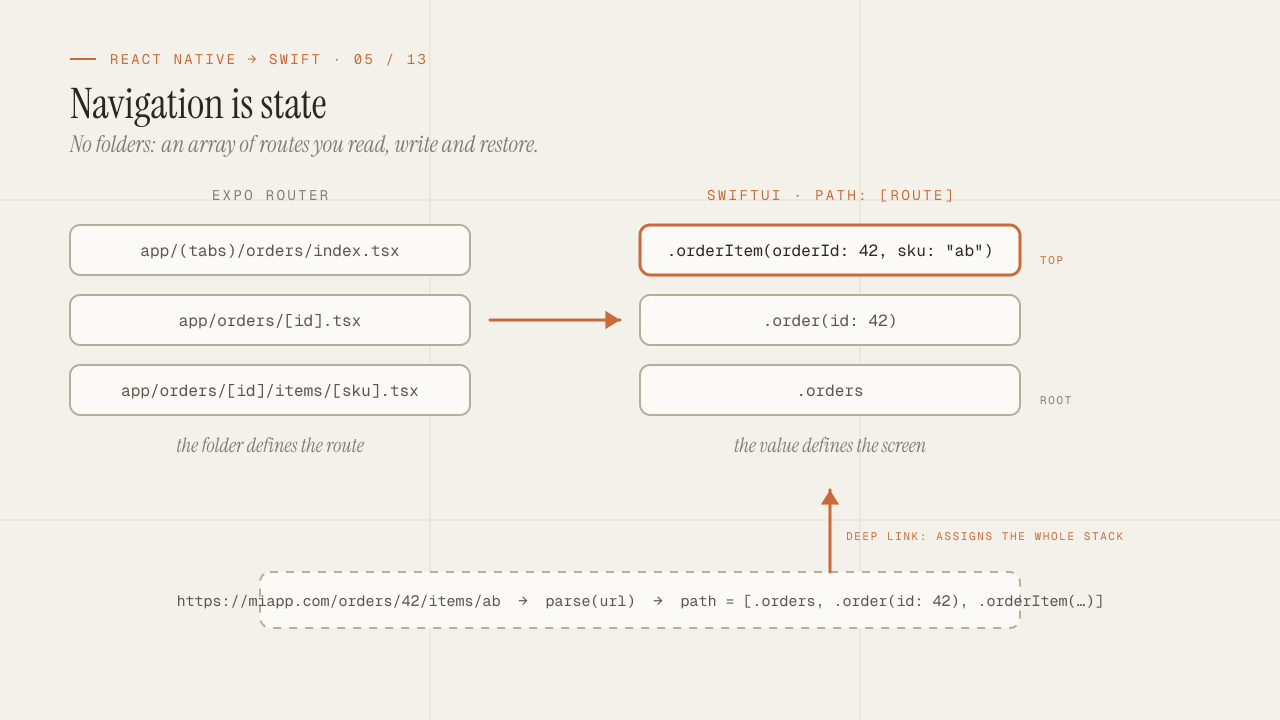
Expo Router solved navigation in React Native with an idea borrowed from the web: the folder structure is the route structure, every file is a screen, and a deep link is a URL that already matches a file. In SwiftUI there are no folders that define anything. Navigation is state: a stack of values that describes which screens are open, and the views are derived from that stack. This post explains how to carry the Expo Router mental model over to NavigationStack with a Route enum, when a Coordinator helps and when it gets in the way, how deep links and Universal Links fit into that model, and what swift-navigation adds when sheets, alerts and pushes become part of the same state.
TL;DR
- In SwiftUI, navigation is an array of values (
NavigationPathor[Route]) that you control. Anenum Routewith associated values replaces Expo Router'sapp/folder, andnavigationDestination(for:)replaces the files. - A deep link is a pure function
URL -> [Route]. Since the stack is state, opening a link means assigning that array; there is no need to "navigate" step by step. - Sheets, alerts and confirmations are state too (an optional that presents when it is not
nil). swift-navigation formalizes this with one destination enum per screen so a view can never show two things at once.
In this article:
- The model — From folders to state · NavigationStack and the Route enum
- The structure — Tabs and stacks · Coordinator: when it helps
- The edges — Deep links and Universal Links · Sheets and alerts with swift-navigation
From folders to state: what changes compared to Expo Router
In Expo Router, app/orders/[id].tsx exists and therefore /orders/42 exists. To go there you write router.push("/orders/42"), the string is resolved against the file system, and React Navigation manages the stack underneath. The navigation state is a consequence of the URLs you kept pushing.
In SwiftUI the order is reversed. The state (a stack of values) exists first, and the screens are a projection of that state. There is no router you ask to “go somewhere”; there is an array you append a value to, and SwiftUI shows the screen that corresponds to that value. The consequences:
- Routes are types, not strings. An
enum Routewithcase order(id: Order.ID)does not accept/orders/abcif the id is numeric, and the compiler warns you when you add a screen and forget its destination. - The stack can be read, written, saved and restored. Going back to the root is
path.removeAll(). Opening a deep link ispath = [.orders, .order(id: 42)]. Restoring the previous session is decoding the array you saved. - There is no file per screen. You can organize the views however you want; navigation does not depend on where they live.
Expo Router                              SwiftUI

app/                                     enum Route: Hashable {
├── (tabs)/                                case orders
│   ├── orders/                            case order(id: Order.ID)
│   │   ├── index.tsx                      case orderItem(orderId: Order.ID, sku: String)
│   │   └── [id].tsx                       case settings
│   └── settings.tsx                     }
└── orders/[id]/items/[sku].tsx
                                         @State var path: [Route] = []
router.push("/orders/42")                path.append(.order(id: 42))
router.replace("/")                      path.removeAll()
useLocalSearchParams()                   the case's associated values
What you lose is the ergonomics of the web: no URL in the address bar, no Link href, no convention anyone recognizes on opening the project. What you gain is navigation that is as testable and as typed as the rest of your state.
NavigationStack and the Route enum
The central piece is NavigationStack with a bound path and navigationDestination(for:) to map each value type to its view. With a Route enum it looks like this:
enum Route: Hashable {
    case order(id: Order.ID)
    case orderItem(orderId: Order.ID, sku: String)
    case settings
}

struct OrdersFlow: View {
    @State private var path: [Route] = []

    var body: some View {
        NavigationStack(path: $path) {
            OrdersScreen(onSelect: { order in
                path.append(.order(id: order.id))
            })
            .navigationDestination(for: Route.self) { route in
                switch route {
                case .order(let id):
                    OrderDetailScreen(orderId: id) { sku in
                        path.append(.orderItem(orderId: id, sku: sku))
                    }
                case .orderItem(let orderId, let sku):
                    OrderItemScreen(orderId: orderId, sku: sku)
                case .settings:
                    SettingsScreen()
                }
            }
        }
    }
}
Three details that matter:
The destination is declared once, close to the root of the stack. SwiftUI accepts navigationDestination(for:) on any view inside the NavigationStack hierarchy (Apple’s example puts it on a List); what it does not accept is inside a lazy container such as the content of a List or a LazyVStack, where it may be ignored with a warning. Centralizing the switch over Route in a single place is a design decision, not a framework restriction, and I make it because it keeps the full map of screens in one file. If you come from React Navigation, this is the Stack.Navigator with all of its Stack.Screen entries declared at the top, not in each component.
Screens do not push routes; they receive closures. OrdersScreen does not know Route exists; it receives onSelect and calls it. That keeps the screen reusable in another flow and testable without navigation. The one that knows about routes is the flow, not the view.
NavigationLink(value:) is the declarative alternative to the manual append: NavigationLink(value: Route.order(id: order.id)) { OrderRow(order: order) } pushes the value on tap. It is convenient in lists and works with the same navigationDestination. I use append when navigation is the consequence of an action (save and move to the next screen) and NavigationLink when it is a row that gets tapped.
On NavigationPath versus [Route]: NavigationPath is a type-erased container that accepts values of any Hashable type, useful when different parts of the app push different types. With a single Route enum, [Route] is simpler, can be inspected in a test (XCTAssertEqual(path, [.order(id: 42)])) and is encoded with Codable without CodableRepresentation. I prefer the array.
Tabs, each with its own stack
In Expo Router, (tabs)/ with nested folders gave you one stack per tab automatically. In SwiftUI, each tab is its own NavigationStack with its own path, and which tab is selected is just one more value:
enum Tab: Hashable { case orders, profile }

@Observable
final class AppNavigation {
    var tab: Tab = .orders
    var ordersPath: [Route] = []
    var profilePath: [Route] = []
}

struct RootView: View {
    @State private var nav = AppNavigation()

    var body: some View {
        @Bindable var nav = nav
        TabView(selection: $nav.tab) {
            Tab("Orders", systemImage: "list.bullet", value: .orders) {
                OrdersFlow(path: $nav.ordersPath)
            }
            Tab("Profile", systemImage: "person", value: .profile) {
                ProfileFlow(path: $nav.profilePath)
            }
        }
        .environment(nav)
    }
}
Keeping the navigation object in the environment lets any screen, or the deep link handler, switch tabs and push routes without knowing the view hierarchy. It is the closest thing to a global router.push you will get, with the difference that it is still observable state.
One behavioral detail: tapping the active tab on iOS pops that stack back to its root, and with a standard TabView and NavigationStack the system provides that behavior. Do not try to reimplement it with .onChange(of: nav.tab): a reselection does not change the binding’s value, so there is no change to observe. If you need to intercept it (for example, to scroll to the top in addition to emptying the stack), a custom Binding over tab whose set compares the new value with the current one is the place to detect it.
The Coordinator pattern: when it helps and when it gets in the way
The Coordinator comes from UIKit: one object per flow that decides which screen comes next, so the ViewControllers do not know about each other. In SwiftUI, with path as state, the AppNavigation object above is already a Coordinator in practice. The question is how much logic you put into it.
When it helps:
- Flows with branches that depend on the domain. An onboarding that skips steps depending on the user type, a checkout that asks for verification only when the amount exceeds a threshold. That decision should not live in the view; it lives in a coordinator method:
func proceedFromCart()that reads the state and performs the rightappend. - Navigation triggered from outside the UI. A push notification, a deep link, a session change that logs the user out. All of them need a single place that knows how to mutate the stack.
- Flow tests. “After a successful payment, the stack must be
[.confirmation]” is a test of a coordinator function, with no UI.
When it gets in the way:
- When every
appendgoes through it. IfOrdersScreenhas to callcoordinator.showOrder(id:)for a row that could be aNavigationLink(value:), you added indirection without a decision. The coordinator steps in when there is logic, not for every push. - When it becomes a singleton the views import. It is injected through the environment or closures are passed down; if a view in a feature package imports the app’s coordinator, the package is no longer reusable.
My approach: one @Observable object per large flow (one per tab is usually enough), with the stacks as properties and methods only for the transitions that carry logic. Everything else is closures or NavigationLink.
Deep links and Universal Links: a URL that becomes a stack
In Expo Router you never wrote the URL-to-screen mapping, because the URL already was the route, and Expo abstracted most of the native configuration for you (the scheme and the associated domains came from app.json). In SwiftUI you have to write both, and the good news about the first one is that it is a pure function: it receives a URL and returns the stack that represents it.
enum DeepLink {
    /// Translates a URL into a destination: tab plus stack. No side effects.
    static func parse(_ url: URL) -> (tab: Tab, path: [Route])? {
        switch segments(of: url) {
        case ["orders"]:
            return (.orders, [])
        case ["orders", let id]:
            guard let orderId = Order.ID(id) else { return nil }
            return (.orders, [.order(id: orderId)])
        case ["orders", let id, "items", let sku]:
            guard let orderId = Order.ID(id) else { return nil }
            return (.orders, [.order(id: orderId), .orderItem(orderId: orderId, sku: sku)])
        case ["settings"]:
            return (.profile, [.settings])
        default:
            return nil
        }
    }

    /// Normalizes the two URL shapes that reach the app.
    /// `https://miapp.com/orders/42` has host `miapp.com` and path `/orders/42`;
    /// `miapp://orders/42` has host `orders` and path `/42`. With a custom scheme,
    /// the host is the first segment of the route.
    private static func segments(of url: URL) -> [String] {
        let path = url.pathComponents.filter { $0 != "/" }
        guard url.scheme == "miapp", let host = url.host() else { return path }
        return [host] + path
    }
}
And at the root, .onOpenURL receives the URL, whether from a custom scheme (miapp://orders/42) or a Universal Link (https://miapp.com/orders/42), and assigns the state:
.onOpenURL { url in
    guard let target = DeepLink.parse(url) else { return }
    nav.tab = target.tab
    switch target.tab {
    case .orders: nav.ordersPath = target.path
    case .profile: nav.profilePath = target.path
    }
}
Notice that the whole stack is assigned at once. In React Navigation, a deep link to a deep screen required configuring initialRouteName so the back button had somewhere to go. Here the stack [.order(id: 42), .orderItem(...)] already includes the intermediate screens, and the back button works because the state is correct, not because someone configured it.
What you do have to configure outside the code, and what Expo did in app.json:
- Custom scheme:
CFBundleURLTypesinInfo.plist. It works on any device, but any app can register the same scheme. - Universal Links: the
Associated Domainsentitlement withapplinks:miapp.com, and anapple-app-site-associationfile served over HTTPS athttps://miapp.com/.well-known/with your Team ID and bundle ID. Without that file, the system opens Safari instead of the app. It is the step that fails most often in production, almost always because of the file (invalid JSON, wrongContent-Type, or the CDN caching an old version).
The parse function is tested without a device: a table of URLs and expected stacks. It is the most cost-effective test in the whole navigation layer, because it covers exactly the part you do not see until a user taps a link in an email.
Sheets, alerts and swift-navigation: when everything is state
A push is a value in the stack. A sheet, in SwiftUI, is an optional: .sheet(item: $editingOrder) { order in EditOrderScreen(order: order) } presents when editingOrder is not nil and dismisses when it becomes nil again. An alert is the same with .alert(item:). And that is where the problem appears: a screen with an edit sheet, a delete confirmation alert and a share sheet has three optionals, and nothing stops two of them from being non-nil at the same time, which SwiftUI resolves by showing one and dropping the other without warning.
swift-navigation (Point-Free, works without TCA) solves that with a single destination enum per screen:
import SwiftUINavigation

@Observable
final class OrderDetailModel {
    @CasePathable
    enum Destination {
        case edit(Order)
        case confirmDelete
        case share(URL)
    }

    var destination: Destination?

    func deleteTapped() { destination = .confirmDelete }
    func editTapped(_ order: Order) { destination = .edit(order) }
}.sheet(item: $model.destination.edit) { order in
EditOrderScreen(order: order)
}
.alert("Delete order?", isPresented: Binding($model.destination.confirmDelete)) {
Button("Delete", role: .destructive) { model.confirmDelete() }
}
.sheet(item: $model.destination.share) { url in
ShareSheet(url: url)
}One optional destination, one active case, and the presentation is derived from it. Tests check model.destination == .confirmDelete after deleteTapped(), without SwiftUI. The library provides the per-case derived bindings ($model.destination.edit) that SwiftUI does not offer out of the box; the rest is the same “presentation is state” pattern applied with discipline.
The change that cost me the most was not the API but the habit: in React Native I opened a modal with
setVisible(true)from wherever I happened to be. In SwiftUI, every time a view presents something, the question is “which state is this derived from?”. When the answer is clear, navigation can be tested; when it is not, there is a loose boolean that will fail in a case you did not try.
Frequently asked questions
Is there anything like Expo Router for SwiftUI, with routes from files?
No, and I do not think there will be: SwiftUI has no compile-time-accessible file system that could be turned into routes. The closest thing is a convention of your own: one Route enum per flow and a URL -> [Route] function. It is more code than Expo Router and, in exchange, it is typed.
How do I make the stack survive the system killing the app?
By saving the array. [Route] with Route: Codable is serialized with JSONEncoder and written to UserDefaults or a file when the app goes to the background (.onChange(of: scenePhase)), and restored on launch. SceneStorage works for simple values, but with an enum with associated values it is clearer to encode it yourself.
What about NavigationView? I see it in many examples.
It has been deprecated since iOS 16. NavigationStack for stacks, NavigationSplitView for master-detail on iPad and Mac. Everything in this post assumes NavigationStack; if you inherit code with NavigationView and isActive, migrating it to path is the first job.
How do I navigate from a ViewModel without importing SwiftUI?
The ViewModel does not navigate: it exposes the result of an action (for example, didSave: Order? or an event) and the flow or the coordinator decides the push. Or the ViewModel receives an onSaved: (Order) -> Void closure that the flow hands to it. In both cases, Route and path never appear in the ViewModel.
Do Universal Links work in development without publishing to the App Store?
Yes, as long as the apple-app-site-association file is served over HTTPS on the domain and the entitlement is in the signing profile. In development you can add ?mode=developer to the domain in the entitlement: with that, the system skips Apple’s CDN and reads the file directly from your domain, and the device needs Associated Domains Development enabled in the developer settings. What does not work is typing or pasting the URL into Safari’s address bar: Apple is explicit that this does not open the app. You have to tap the link from another surface (Notes, Messages, an email) for it to count as a universal link.
Conclusion
Navigation in SwiftUI is not declared with folders; it is modeled as state. An enum Route with associated values replaces Expo Router’s file structure, NavigationStack(path:) with a single navigationDestination at the root replaces the implicit stack, each tab has its own stack, and a deep link is a pure function from URL to [Route] that is tested with a table. Sheets and alerts follow the same rule: a single destination state per screen, which swift-navigation helps keep exclusive.
To get started: define the Route enum for your main flow, move all navigation into a path you can print in a test, write parse(url) before configuring the Universal Links, and turn every loose isPresented into a case of a destination enum. The next post goes into the layer you miss most after leaving React Native: the network cache TanStack Query handled for you, and how to design your own with URLSession, AsyncStream and a local database as the cache.
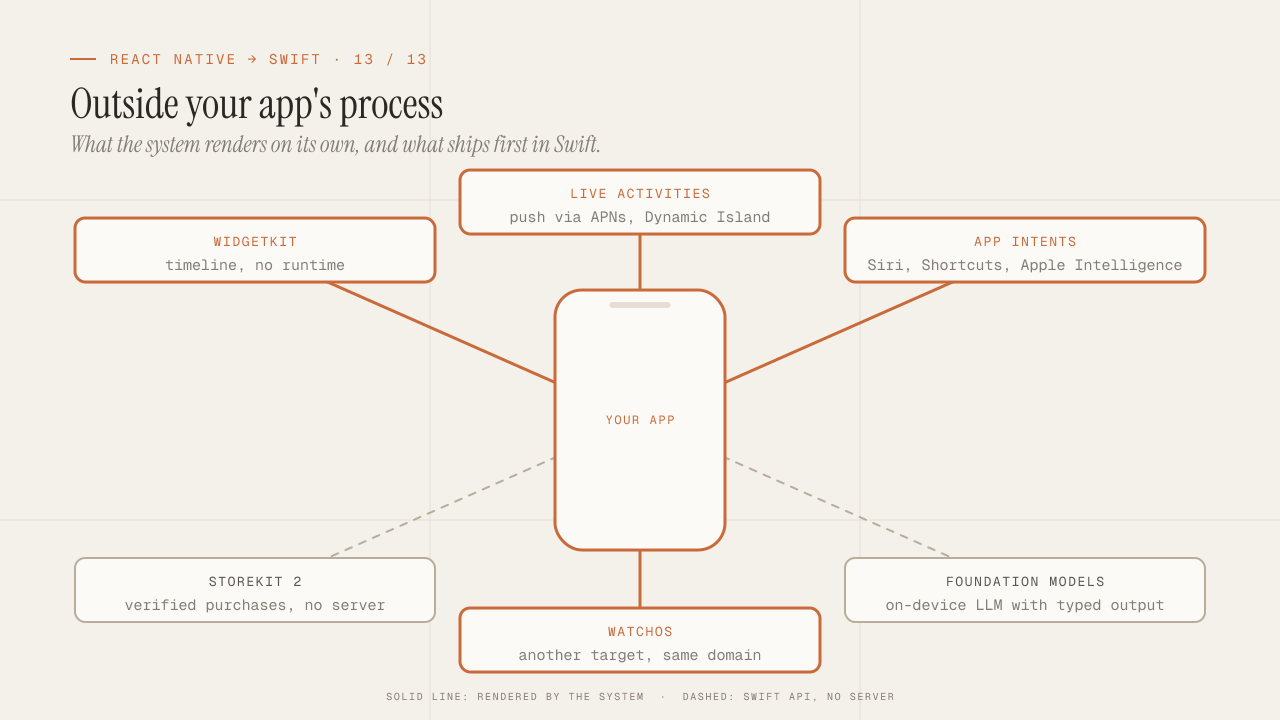
What you can only do in native: WidgetKit, Live Activities, App Intents, StoreKit 2, Foundation Models and watchOS
The iOS capabilities React Native does not offer and that justify Swift to a client: WidgetKit, Live Activities, App Intents and Siri, StoreKit 2, the on-device language model with Foundation Models and watchOS. Series close and sales argument.
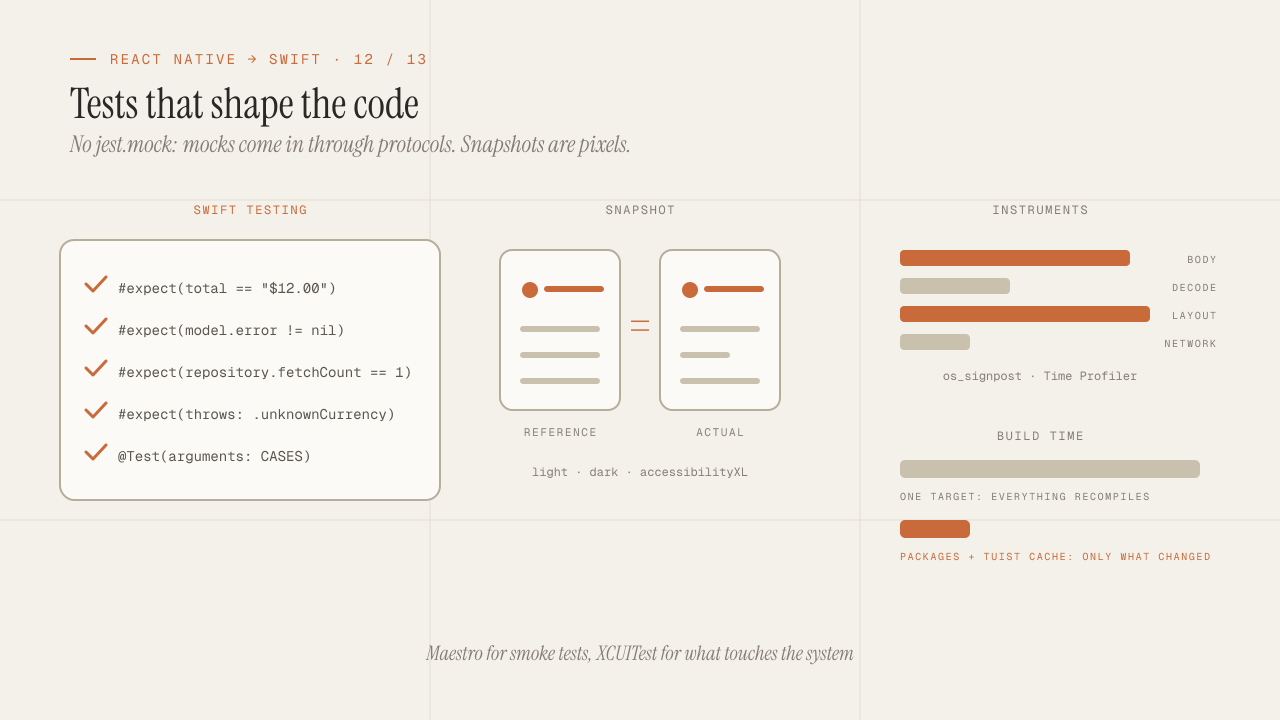
iOS testing and tooling for seniors: Swift Testing, snapshots, mocks, Instruments and build times
How to test an iOS app coming from Jest and Testing Library: Swift Testing versus XCTest, snapshot testing, mocks via protocols and URLProtocol without jest.mock, XCUITest versus Maestro, Instruments, SwiftLint and modularizing to cut build times.
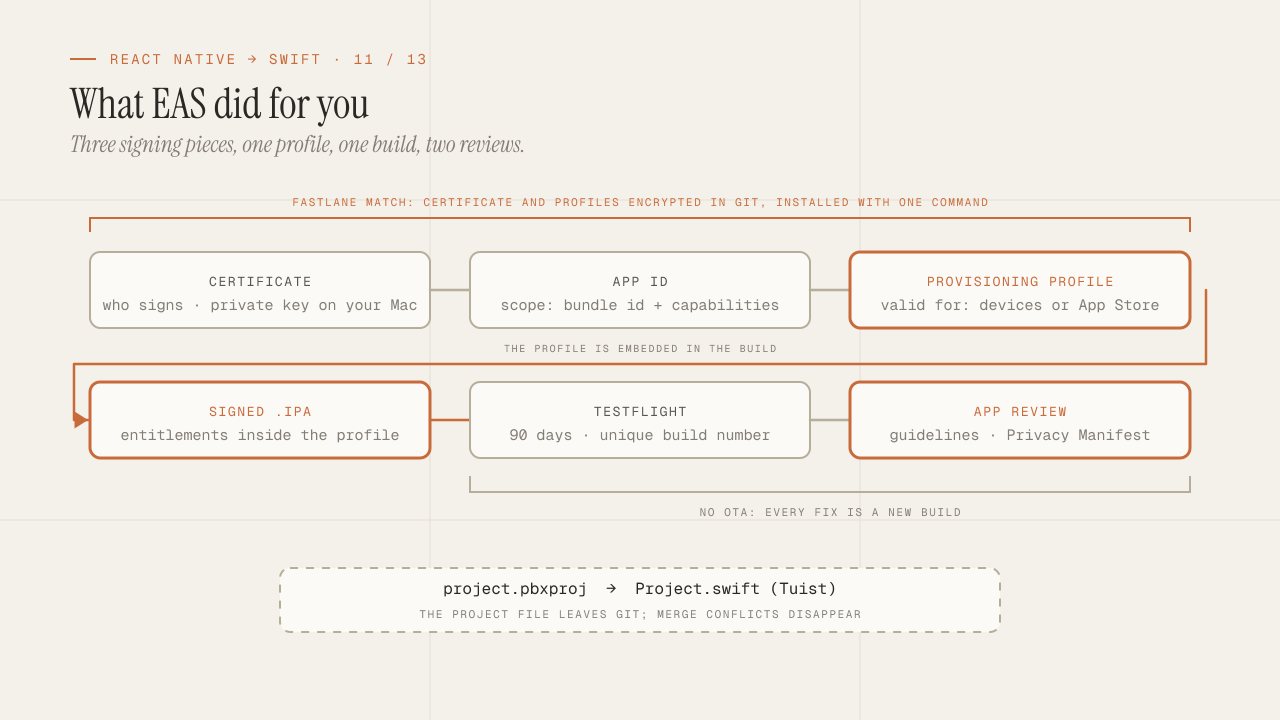
Build, signing and the App Store: what EAS hid from you
What EAS Build did for you and is now yours: certificates, provisioning profiles and entitlements explained once, Fastlane match for team signing, TestFlight, the App Review guidelines that reject the most, the Privacy Manifest and Tuist.
