iOS testing and tooling for seniors: Swift Testing, snapshots, mocks, Instruments and build times
How to test an iOS app coming from Jest and Testing Library: Swift Testing versus XCTest, snapshot testing, mocks via protocols and URLProtocol without jest.mock, XCUITest versus Maestro, Instruments, SwiftLint and modularizing to cut build times.
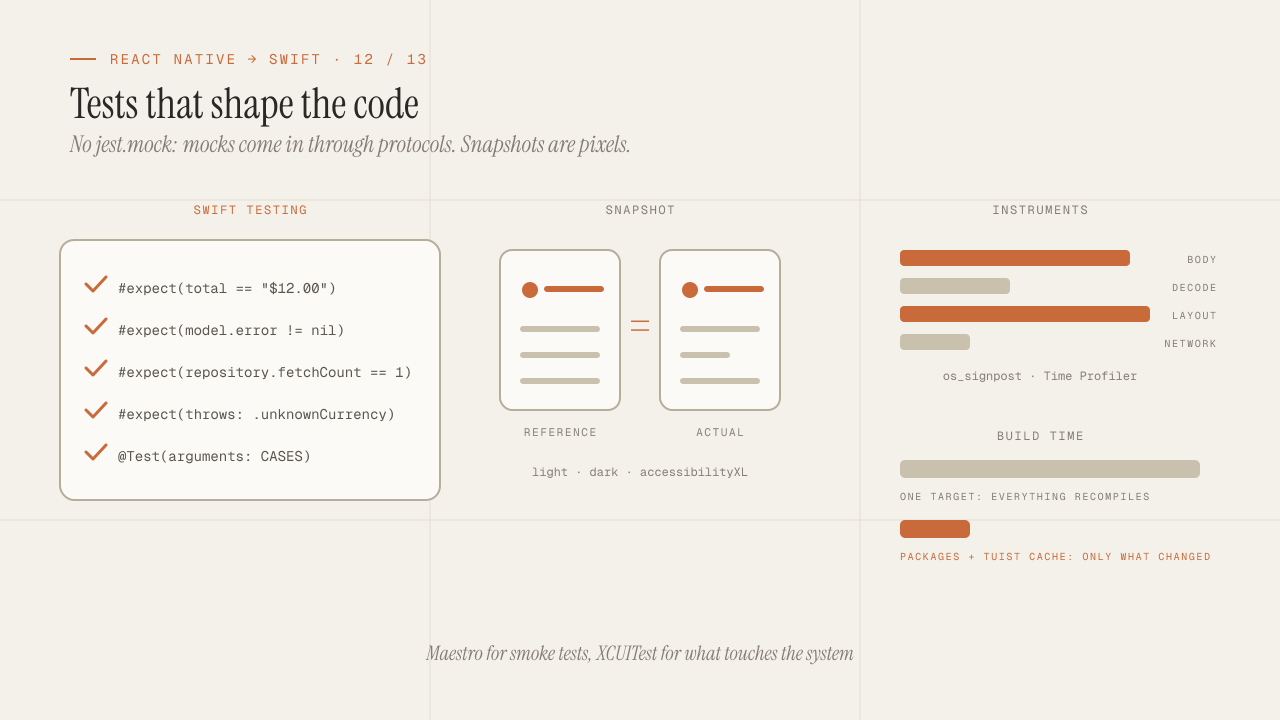
In React Native, testing meant Jest for logic, Testing Library for components, jest.mock for any module, Detox or Maestro for the full flow, and Flipper or React DevTools to look inside. On iOS the division is similar, but each piece comes with a constraint that changes how you design the code: there is no jest.mock, so mocks come in through protocols or through the network layer; there are no component-tree snapshots, there are pixel snapshots; and build time is a design factor, not a tooling detail. This post covers the complete toolbox of a senior on iOS: Swift Testing versus XCTest, snapshot testing, mocks, UI tests with XCUITest or Maestro, Instruments for performance, SwiftLint, and the architecture that keeps build times low.
TL;DR
- Swift Testing (
@Test,#expect, parameterized tests) is the framework for new code; XCTest is still required for UI and performance tests. The two coexist in the same target. - Without
jest.mock, mocks come in by design: one protocol per dependency with a fake implementation, andURLProtocolto intercept the network without touching the client. Snapshots compare rendered images, and they are the cheapest test for a SwiftUI view. - Build times come down with architecture: small packages, explicit types in long expressions, and Tuist with caching. Instruments tells you where the app's time goes; the compiler, with flags, tells you where the build's time goes.
In this article:
- Unit tests — Swift Testing versus XCTest · Mocks without jest.mock · Snapshot testing
- UI tests — XCUITest versus Maestro
- Tooling — Instruments · SwiftLint and formatting · Build times
Swift Testing versus XCTest
XCTest is the framework that has always been there: classes that inherit from XCTestCase, methods that start with test, and XCTAssertEqual assertions. Swift Testing arrived in 2024 with Xcode 16 as the modern framework: free functions marked with @Test, a single assertion macro #expect that shows every subexpression when it fails, parameterized tests that run one case per argument, and struct instead of classes, so each test gets a fresh instance without setUp.
import Testing
@testable import Domain

struct PriceFormatterTests {
    @Test func formatsWholeAmounts() {
        #expect(PriceFormatter.format(12, currency: "USD") == "$12.00")
    }

    @Test(arguments: [
        (Decimal(0.5), "$0.50"),
        (Decimal(1234.5), "$1,234.50"),
        (Decimal(-3), "-$3.00"),
    ])
    func formatsEdgeCases(amount: Decimal, expected: String) {
        #expect(PriceFormatter.format(amount, currency: "USD") == expected)
    }

    @Test func rejectsUnknownCurrency() throws {
        #expect(throws: PriceFormatter.Error.unknownCurrency) {
            try PriceFormatter.format(1, currency: "XYZ", strict: true)
        }
    }
}
What changes compared to Jest in practice:
#expect(a == b)replacesexpect(a).toBe(b), and on failure it prints the value ofaand ofbwithout you writing a message.#requireis the same but aborts the test if it fails, which is useful for unwrapping optionals:let user = try #require(result.user).- Parameterized tests replace
it.each, and each case shows up separately in the Xcode test navigator, with its own result. - Tests are
asyncwhen they need to be, with nowaitForExpectations. A@Test func loads() async throwswaits for whatever it has to wait for. - Tests run in parallel by default, in the same process. If two tests share global state (a singleton,
UserDefaults), they fail intermittently..serializedon a@Suiteruns them in sequence, but the better answer is to have no global state, which is what the dependency injection from the architecture post already solved.
What Swift Testing still does not do and XCTest does: UI tests (XCUIApplication) and performance tests (measure { } with metrics). Both frameworks coexist in the same target, so the rule is simple: Swift Testing for everything new, XCTest for UI and performance.
Mocks without jest.mock: protocols and URLProtocol
jest.mock("./api") replaced an entire module in the test without touching the code. In Swift it does not exist: the compiler links concrete types and there is no module system that can be intercepted at runtime. Mocks come in through two paths, and both are design decisions.
One protocol per dependency, with a fake implementation. This is why the architecture post insisted on injecting from day one:
protocol OrderRepository: Sendable {
    func fetchAll() async throws -> [Order]
}

// In the test target:
final class FakeOrderRepository: OrderRepository, @unchecked Sendable {
    var result: Result<[Order], Error> = .success([])
    private(set) var fetchCount = 0

    func fetchAll() async throws -> [Order] {
        fetchCount += 1
        return try result.get()
    }
}

@Test @MainActor
func showsErrorWhenRepositoryFails() async {
    let repository = FakeOrderRepository()
    repository.result = .failure(URLError(.notConnectedToInternet))
    let model = OrdersViewModel(repository: repository)

    await model.load()

    #expect(model.error != nil)
    #expect(repository.fetchCount == 1)
}
With swift-dependencies, the same test is written with withDependencies { $0.orderClient.fetchAll = { throw URLError(.notConnectedToInternet) } } and the fake class is not needed. With Factory, Container.shared.orderRepository.register { FakeOrderRepository() }. The structure is the same: the dependency is replaced from outside, not from inside the module.
To generate the fake implementations without writing them, there are macros and tools (Mockable, Cuckoo, Sourcery with templates) that produce one mock per protocol with call recording. For a medium-sized project, writing them by hand is usually less work than maintaining the tool.
URLProtocol to intercept the network. When you want to test the real APIClient (decoding, HTTP status handling, retries) without a network, a URLProtocol subclass registered in the URLSessionConfiguration intercepts every request and returns whatever the test says. It is the equivalent of msw or nock:
final class StubURLProtocol: URLProtocol {
    nonisolated(unsafe) static var handler: ((URLRequest) throws -> (HTTPURLResponse, Data))?

    override class func canInit(with request: URLRequest) -> Bool { true }
    override class func canonicalRequest(for request: URLRequest) -> URLRequest { request }

    override func startLoading() {
        guard let handler = Self.handler else { return }
        do {
            let (response, data) = try handler(request)
            client?.urlProtocol(self, didReceive: response, cacheStoragePolicy: .notAllowed)
            client?.urlProtocol(self, didLoad: data)
            client?.urlProtocolDidFinishLoading(self)
        } catch {
            client?.urlProtocol(self, didFailWithError: error)
        }
    }

    override func stopLoading() {}
}

@Test func decodesOrdersFromServer() async throws {
    let config = URLSessionConfiguration.ephemeral
    config.protocolClasses = [StubURLProtocol.self]
    StubURLProtocol.handler = { request in
        #expect(request.url?.path == "/orders")
        let body = #"[{"id":"1","total":"12.50","created_at":"2026-09-01T00:00:00Z","items":[]}]"#
        return (HTTPURLResponse(url: request.url!, statusCode: 200, httpVersion: nil, headerFields: nil)!, Data(body.utf8))
    }
    let client = APIClient(baseURL: URL(string: "https://api.test")!, session: URLSession(configuration: config), decoder: .api, tokenProvider: { nil })

    let orders: [OrderDTO] = try await client.get("/orders")

    #expect(orders.count == 1)
    #expect(orders[0].total == 12.50)
}
With this, the real client is tested against recorded backend responses, including 4xx and 5xx errors, with no mock anywhere in production code.
Snapshot testing: the cheap way to test a view
Testing Library rendered a component into a simulated DOM and queried it by role or by text. In SwiftUI there is no DOM to query, and although there are libraries that inspect the view tree (ViewInspector), they are fragile against SwiftUI changes. The approach that holds up is image snapshot testing: render the view to a PNG and compare it against a reference stored in the repository.
The standard library is swift-snapshot-testing (Point-Free), which integrates with XCTest and with Swift Testing:
import SnapshotTesting
import SwiftUI
import Testing
@testable import OrdersFeature

@MainActor
struct OrderRowSnapshotTests {
    @Test func rendersPendingOrder() {
        let view = OrderRow(order: .fixture(status: .pending))
            .frame(width: 390)

        assertSnapshot(of: view, as: .image(layout: .sizeThatFits, traits: .init(userInterfaceStyle: .light)))
        assertSnapshot(of: view, as: .image(layout: .sizeThatFits, traits: .init(userInterfaceStyle: .dark)), named: "dark")
        assertSnapshot(
            of: view,
            as: .image(layout: .sizeThatFits, traits: .init(preferredContentSizeCategory: .accessibilityExtraLarge)),
            named: "a11y-xl"
        )
    }
}
The first run records the reference; the following ones compare. Three variants per view (light, dark, large text) cost three lines and catch most visual regressions, including the ones that break Dynamic Type, which was the point of the UI post.
The rules that keep them from becoming a problem:
- Same simulator locally and in CI. A change in iOS version or device model changes the render and every snapshot fails. Pin the simulator in the test script, and re-record in a separate PR when it is updated.
- Fixed data. Dates, names, amounts: everything from the fixture, no
Date.now. - Small views. A row, a card, a form. A snapshot of a full screen fails on any change and does not tell you which one.
- Precision with tolerance (
precision: 0.99) to absorb antialiasing differences between machines.
Snapshots also work for other types: as: .json for a Codable, as: .dump for any value, as: .lines for text. The snapshot of a decoded API response is the one that has warned me most often about a contract change on the backend.
XCUITest versus Maestro
XCUITest is Apple’s framework for UI tests: a separate process that launches the app, drives it through accessibility (labels, identifiers) and asserts on what it sees. It is written in Swift with XCTest, runs from Xcode or xcodebuild test, and can record interactions from the editor.
final class CheckoutUITests: XCTestCase {
    func testCompletesCheckout() {
        let app = XCUIApplication()
        app.launchArguments = ["-ui-testing", "-seed-cart"]   // the app launches with fixed data
        app.launch()

        app.buttons["cart.checkout"].tap()
        app.textFields["checkout.email"].tap()
        app.textFields["checkout.email"].typeText("ana@example.com")
        app.buttons["checkout.pay"].tap()

        XCTAssertTrue(app.staticTexts["checkout.confirmation"].waitForExistence(timeout: 5))
    }
}
Maestro is the one you already know from React Native: flows in YAML, no code, executed against the simulator or a device. It works the same with a native app, because it talks to the app through accessibility, not through the runtime:
appId: com.empresa.app
---
- launchApp:
    arguments:
      ui-testing: true
      seed-cart: true
- tapOn:
    id: "cart.checkout"
- tapOn:
    id: "checkout.email"
- inputText: "ana@example.com"
- tapOn:
    id: "checkout.pay"
- assertVisible:
    id: "checkout.confirmation"
When to use each:
| Criterion | XCUITest | Maestro |
|---|---|---|
| Who writes them | Developers, in Swift | QA or developers, in YAML |
| Execution speed | Slow; each test launches the app | Faster per flow; less setup |
| Stability | Good with identifiers and waitForExistence | Good; retries and waits built in |
| Xcode integration | Full: results, screenshots and recording in the test navigator | External: CLI and Maestro Cloud |
| System access | Can interact with permission alerts, Settings and other apps | Limited to the app and common alerts |
| Performance and metrics | XCTMetric for launch time and scroll | No |
In practice I use both: Maestro for the smoke flows that run on every PR (launch, sign in, reach the main screen, complete a checkout), because they are fast to write and to read; XCUITest for what requires the system (permission flows, deep links from another app, notifications) and for performance metrics. In both cases, what makes a UI test stable is the same thing: accessibility identifiers (.accessibilityIdentifier("checkout.pay")) on every control you interact with, and an app mode that launches with fixed data and no network.
Instruments: where the app’s time goes
Flipper and the React DevTools profiler have no direct equivalent because the problem is different: there is no bridge and no JavaScript thread to look at. What there is instead is Instruments, the system profiling tool, which opens from Xcode with Product > Profile and offers templates for each kind of problem:
- Time Profiler: where CPU time goes, by thread and by function. The first place to look for stuttering scroll or a slow launch.
- SwiftUI: how many times each
bodyis evaluated, how long it takes, and which state change triggered it. It answers “why does this view re-evaluate so much?”, and the answer is usually an@Observablewhose property is read in abodythat does not need it. - Allocations and Leaks: retained memory and reference cycles. In Swift, cycles show up with closures that capture
selfwithout[weak self]in long-lived classes. - Network: every request with timings, size and status.
- Animation Hitches: dropped frames in animations and scroll, with the cause (layout, render, commit).
- App Launch: the phases of launch, for time to first frame.
Two practices that change the result: profile on a physical device and on a Release build (the simulator and Debug give timings that look nothing like production), and use os_signpost in the code to mark the intervals you care about ("load orders", "decode") and see them on the Instruments timeline next to everything else.
For production, MetricKit delivers aggregated diagnostics for launch, dropped frames, battery use and crashes with no third-party SDK, and Xcode Organizer shows the same data per version for published apps. A crash reporter (Crashlytics, Sentry) is still needed for individual stack traces with context.
SwiftLint and swift-format
ESLint and Prettier have their equivalents, with one difference: in Swift, formatting and linting are two separate tools and neither is enabled by default.
SwiftLint is the linter: style and correctness rules (force_unwrapping, unused_closure_parameter, cyclomatic_complexity), with a .swiftlint.yml and a build plugin so warnings show up in Xcode. The rules I always enable, on top of the defaults:
opt_in_rules:
  - force_unwrapping           # the `!` the Swift post asked you to avoid
  - implicitly_unwrapped_optional
  - unowned_variable_capture
  - private_outlet
  - sorted_imports
  - explicit_init
disabled_rules:
  - line_length                # the formatter handles it
  - todo
swift-format is the formatter, maintained by Apple and integrated into the toolchain since Swift 6, with swift format as a subcommand. It is configured with .swift-format and runs in a pre-commit hook or in CI with --lint. Before it shipped with the toolchain, SwiftFormat (by Nick Lockwood, no hyphen) was the standard, and it is still more configurable; both work.
The combination I use: swift-format so nobody argues about formatting, SwiftLint for the correctness rules, and both in CI failing the PR. The same as ESLint plus Prettier, with one more file.
Build times: how to measure them and how to cut them
The first post promised this topic would get its own section, because it is the most frequent complaint from anyone coming from Fast Refresh. A clean build of a medium-sized project can take several minutes; an incremental build after touching one file, from seconds to a minute depending on what that file drags along. The difference between those two extremes is architecture.
How to measure. Xcode shows the time of the last build in the status bar, and Product > Perform Action > Build With Timing Summary breaks it down by phase. To find the expressions that take long, two flags in the target’s Other Swift Flags:
-Xfrontend -warn-long-function-bodies=100
-Xfrontend -warn-long-expression-type-checking=100
They produce a warning for every function or expression whose type checking exceeds one hundred milliseconds. It is almost always the same two things: long expressions with untyped literals (let total = a * 0.2 + b * 1.5 - c / 3) and SwiftUI body with many branches. The fix is to annotate types (let total: Double = ...) and split the body into subviews.
How to cut the incremental build. Swift recompiles the whole module when the interface of a type that other files use changes. With everything in one target, any change to a shared type recompiles almost everything. With packages per layer, a change in OrdersFeature recompiles OrdersFeature and the app, and nothing else. It is the performance argument for the modularization the architecture post made for other reasons, and in a large project it is the one you notice most.
The levers, in order of impact:
- Small packages with dependencies in one direction. Domain with no dependencies, network and persistence on top of domain, features on top of all three. A change in one feature recompiles no other.
internalby default,publiconly on the interface. Less public surface, fewer modules that depend on a change.- Explicit types in long expressions and
bodysplit into small views. What the flags above point at. - Tuist with module caching so packages without changes arrive already compiled. In CI, the difference between a clean build of several minutes and one of one or two.
- Previews in the feature’s package, not in the app. They compile only that module.
- Fewer macros and fewer deep generics in hot paths. Every macro expands on every compilation; a type with ten levels of nested generics is expensive to check. You notice them when the timing summary points at them, not before.
The project where I learned the most about build times was not the largest one, but a single-target project with a file of design constants that every view imported. Changing a color recompiled the entire app. Moving it to a design package was an hour of work, and the incremental build for the screens went from “go get a coffee” to “wait in your seat”.
Frequently asked questions
Do I need UI tests if I have snapshots and ViewModel tests?
Fewer than you think. Snapshots cover the render and ViewModel tests cover the logic; UI tests cover the integration between screens, real navigation and system flows. A few smoke flows with Maestro, running on every PR, deliver most of the value. Hundreds of UI tests are slow, fragile and rarely catch something the other two levels did not.
How do I test code with @MainActor or with actors?
Swift Testing tests can be marked @MainActor (as in the example above) and be async. For your own actors, you test the observable behavior with await. To control time (Task.sleep, debounces), you inject a Clock and in the test you use a test clock (swift-clocks from Point-Free) that you advance by hand; without it, a test for a 300 ms debounce takes 300 ms.
Is there code coverage?
Yes, built in: you enable it in the test scheme and Xcode shows coverage per file and per line. xcodebuild test -enableCodeCoverage YES generates it in CI, and xccov exports it to JSON for the report. No external tools.
How do I run the tests in CI without Xcode open?
xcodebuild test -scheme App -destination 'platform=iOS Simulator,name=iPhone 16', or fastlane scan, which wraps the same thing with better output. For packages with no UIKit dependency, swift test from the command line is faster because it does not start the simulator. With Tuist, tuist test runs only the modules affected by the change.
Is TDD worth it in SwiftUI?
For logic (ViewModels, domain, parsers), yes, and it works the same as in any language. For views, no: the cycle of writing a snapshot before the view adds nothing, because the snapshot is the view. What does work for views is designing with Previews and fake data, and recording the snapshot once the Preview looks right.
Conclusion
The iOS testing toolbox is not poorer than React Native’s, but it demands more design: without jest.mock, mocks come in through injected protocols or through URLProtocol, and that forces an architecture you could postpone in JavaScript. Swift Testing is the framework for everything new, with XCTest for UI and performance. Image snapshots are the cheapest test for a view, and with three variants they cover dark mode and Dynamic Type. Maestro works the same as before for smoke flows, and XCUITest for what touches the system. Instruments answers where the app’s time goes, and the compiler flags plus packages answer where the build’s time goes.
To get started: one test target per package with Swift Testing, one FakeRepository per protocol, one StubURLProtocol for the client, three snapshots per view, one smoke flow in Maestro, SwiftLint and swift-format in CI, and the build-time flags enabled from day one. The last post closes the series with the argument that opened it, now in detail: what you can only do in native (WidgetKit, Live Activities, App Intents, StoreKit 2, Foundation Models, watchOS) and how to present it to a client.
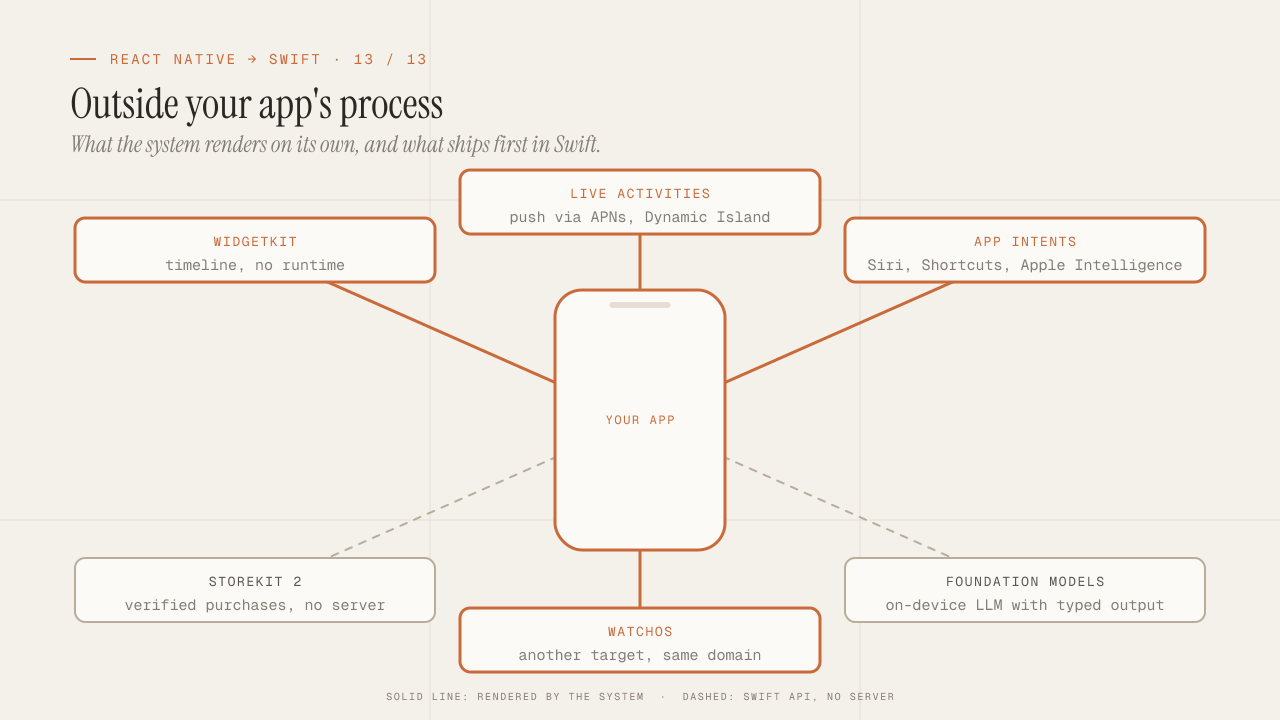
What you can only do in native: WidgetKit, Live Activities, App Intents, StoreKit 2, Foundation Models and watchOS
The iOS capabilities React Native does not offer and that justify Swift to a client: WidgetKit, Live Activities, App Intents and Siri, StoreKit 2, the on-device language model with Foundation Models and watchOS. Series close and sales argument.
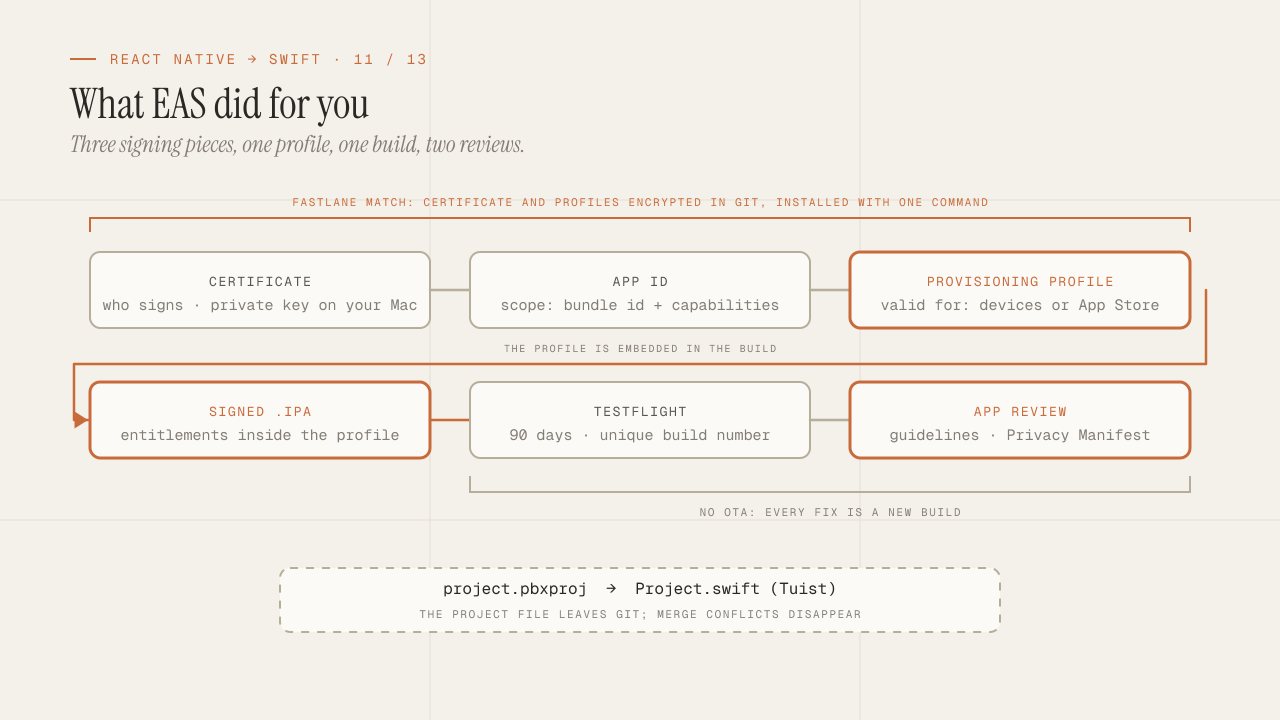
Build, signing and the App Store: what EAS hid from you
What EAS Build did for you and is now yours: certificates, provisioning profiles and entitlements explained once, Fastlane match for team signing, TestFlight, the App Review guidelines that reject the most, the Privacy Manifest and Tuist.
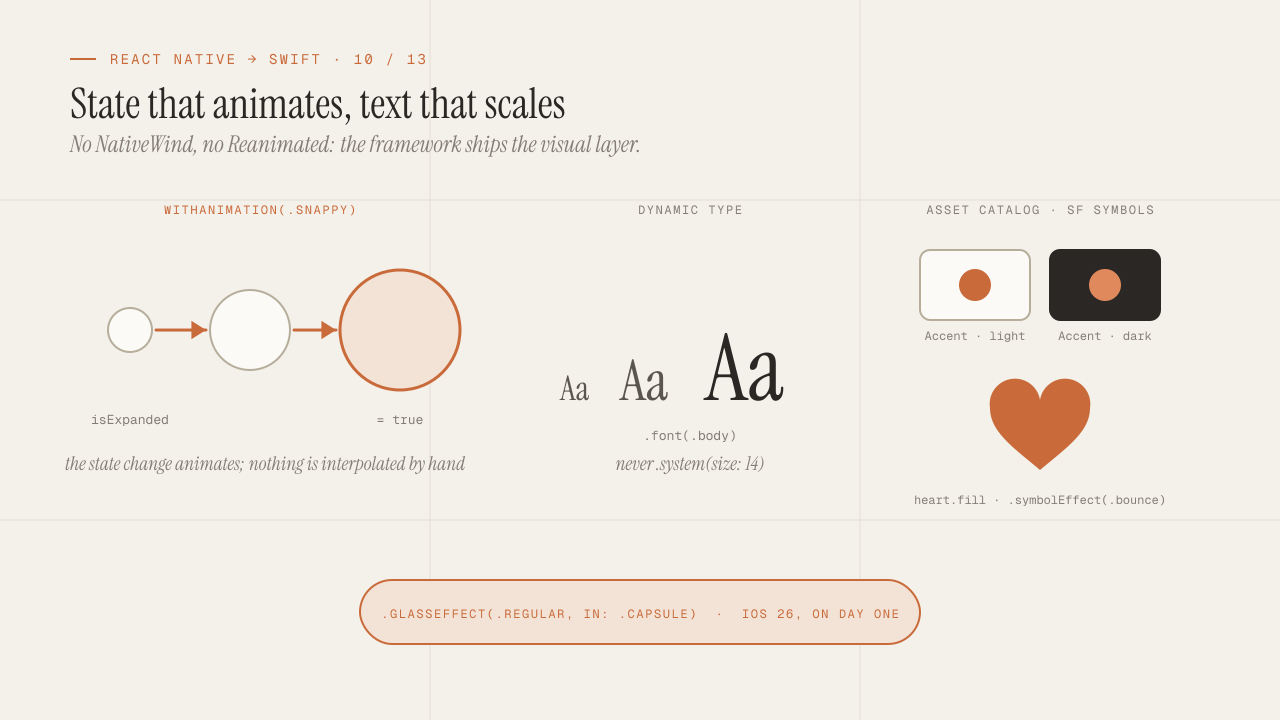
UI, theming and animations in SwiftUI without NativeWind or Reanimated
How to do theming, animations and accessibility in SwiftUI coming from NativeWind and Reanimated: design tokens in the Asset Catalog, Dynamic Type as the default, SF Symbols, withAnimation, matchedGeometryEffect, PhaseAnimator, native gestures and Liquid Glass as a day-one API.
